
Blasted Steps stands as one of Hollow Knight: Silksong's most treacherous and pivotal areas, serving as both a challenging gauntlet of environmental hazards and the gateway to Act 2. This windswept expanse of broken stone steps and exposed ledges connects from Shellwood and leads to the crucial encounter with The Last Judge at the Grand Gate - a boss fight that unlocks the path to the Citadel and marks the beginning of Silksong's second act.
The area's signature wind mechanics fundamentally alter movement and combat, requiring players to master timing-based platforming while avoiding the deadly burrowing sand creatures below. With approximately 70 Rosaries needed to purchase the area map from Shakra, Blasted Steps presents both a skill check and resource management challenge that tests every aspect of Hornet's growing abilities.
Overview
Blasted Steps represents a dramatic shift from Pharloom's earlier underground caverns to an exposed, hostile desert environment where environmental mastery becomes survival. This area introduces several key mechanics that define late-game progression:
Key Features
- Dynamic Wind System: Strong gusts affect jump distance and trajectory, requiring precise timing
- Sand Burrower Hazards: Aggressive underground enemies punish extended ground contact
- Act 1 Finale: Houses The Last Judge boss fight at the Grand Gate
- Citadel Gateway: Primary entrance to Silksong's second major region
- Advanced Platforming: Long chain gaps and precise bell-hopping sequences
- Resource Investment: Significant Rosary cost for full area mapping (~70 Rosaries)
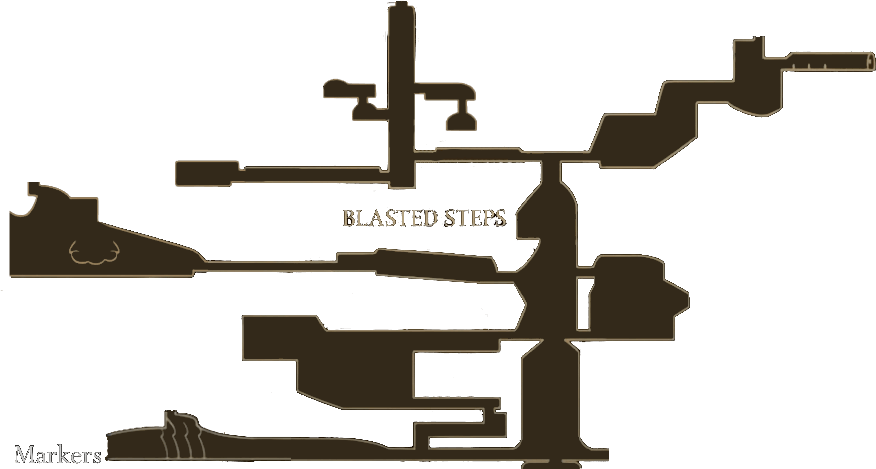
Map Highlights & Navigation
Essential Landmarks
- Benches: Strategically positioned to anchor progress through hazardous wind sections
- Bell Travel Stations: Critical for reducing backtrack time to Grand Gate encounters
- Shakra's Map Vendor: Located off main paths requiring dedicated exploration
- Grand Gate Antechamber: Final checkpoint before The Last Judge encounter
- Chain Gap Crossing: Notorious wind-timing challenge that gates progression
Map Acquisition Strategy
Securing the Blasted Steps map requires approximately 70 Rosaries and careful navigation to Shakra's hidden location. The investment pays dividends for understanding the area's complex layout and locating critical collectibles. See our dedicated map acquisition guide for step-by-step directions and Rosary farming tips.
Environmental Hazards & Advanced Traversal
Wind Mechanics Mastery
Blasted Steps' signature wind system creates dynamic platforming challenges that separate novice players from veterans. Understanding wind patterns becomes essential for survival:
Wind Gust Timing
- Visual Cues: Sand particles and cloth banners indicate wind direction and intensity
- Audio Signals: Distinct whooshing sounds precede major gusts
- Strategic Waiting: Patience at jump points often means the difference between success and death
- The Chain Gap: Most notorious wind-dependent jump requiring perfect timing
Aerial Control Techniques
- Use short hops to test wind strength before committing to long jumps
- Ledge-grabbing provides crucial reset opportunities during gusts
- Wind gliding (if unlocked) offers more forgiving traversal options
Sand Burrower Threat Assessment
The desert floor harbors aggressive sand-dwelling creatures that emerge without warning:
Behavior Patterns
- Triggered by extended ground contact (≥2 seconds on sand)
- Most active near dune crests and loose sand areas
- Can be avoided entirely by maintaining momentum and using rock platforms
Counter-Strategies
- Stick to stone ledges and stable platforms whenever possible
- Clear aerial enemies before attempting wind-dependent jumps
- Plan escape routes before engaging ground-level exploration
Critical Recovery Points
- First Bench Priority: Secure before deep exploration to minimize death penalties
- Bell Station Activation: Essential for efficient boss fight attempts
- Shakra Checkpoint: Natural rest point during map acquisition runs
Route Tips
- Approach: Enter from Shellwood’s upper routes; prioritize the bench first.
- Updrafts: Control jump height and drift to align with gusts.
- Linking routes: Connects well to Far Fields and mid‑game paths.
The Last Judge Boss Encounter
Blasted Steps culminates in The Last Judge - one of Silksong's most challenging Act 1 encounters and the key to Citadel access.
Boss Location & Access
- Location: Grand Gate at Blasted Steps' eastern terminus
- Requirements: Ring grand bells across Pharloom (story progression)
- Summon Method: Speak to two Pilgrims, then play Needolin
- Stakes: Victory opens the Grand Gate and begins Act 2
Fight Overview
Phase Structure: Three escalating phases with fire enhancements Key Challenges:
- Jump & slam attacks with generous punish windows
- Chain throw mechanics requiring positioning mastery
- Fire-enhanced abilities in phases 2 and 3
- Self-destruct finale demanding immediate retreat
Recommended Preparation
- Essential Tool: Magma Bell for fire damage reduction
- Backup Protection: Magnetite Dice for emergency damage negation
- Weapon Enhancement: Needle upgrade from Pinmaster Plinney significantly reduces fight duration
- Ability Choice: Threadstorm excels for close-range punishment windows
For complete boss strategy, see our dedicated Last Judge guide.
Collectibles & Completion
Mask Shard Locations
Blasted Steps contains several Mask Shard locations requiring advanced platforming:
- Hidden alcoves accessible only during specific wind conditions
- Bell-hopping sequences leading to secret chambers
- Post-boss areas unlocked after Grand Gate opening
Spool Fragment Hunting
Strategic Collection Points:
- Wind-protected nooks near major platforming challenges
- Shakra's vendor area contains multiple fragments
- Grand Gate antechamber rewards thorough exploration
100% Completion Checklist
- Secure area map from Shakra (70 Rosaries)
- Activate all Bell travel stations
- Collect all Mask Shards and Spool Fragments
- Defeat The Last Judge to unlock Citadel
- Explore post-boss areas for additional secrets
Frequently Asked Questions
Q: How much do I need to spend on the Blasted Steps map?
A: Approximately 70 Rosaries. If you're short on currency, check our fast Rosaries farming guide.
Q: Can I skip The Last Judge fight?
A: While some sequence breaks via Bilewater/Mist routes are reported, The Last Judge represents the intended Act 1 finale and provides crucial story progression.
Q: What movement abilities do I need for the chain gap?
A: No specific upgrades are hard-required, but Wind Gliding makes the crossing significantly more forgiving.
Q: How do I survive the sand burrowers?
A: Maintain momentum, stick to rock platforms, and avoid extended ground contact. The creatures won't emerge if you keep moving across stable surfaces.
Q: Is there a faster way back to the Grand Gate?
A: Activate the Bell travel station near the area for quick access. The runback from the nearest bench takes 2-3 minutes of careful platforming.
Advanced Tips & Strategies
Wind Reading Mastery
- Visual Indicators: Sand movement, banner flutter, and particle effects reveal wind patterns
- Audio Cues: Learn to distinguish wind intensities by sound alone
- Timing Windows: Most strong gusts last 2-3 seconds - plan jumps accordingly
Combat in Windy Conditions
- Position enemies between you and favorable wind directions
- Use wind to enhance attack reach and movement speed
- Retreat to wind-sheltered areas for healing opportunities
Resource Management
- Save Silk abilities for emergency recoveries rather than routine traversal
- Prioritize fire resistance tools if planning multiple Last Judge attempts
- Consider defensive loadouts for first-time area exploration
Related Guides & Resources
- How to Reach Blasted Steps & Get Map - Complete entry walkthrough
- Last Judge Boss Fight Strategy - Detailed boss guide
- Map Locations (Early Game) - Area mapping overview
- 100% Completion Route - Speedrun optimization
- Wind Gliding Unlock Guide - Movement enhancement
Sources
- Video route to Blasted Steps: https://www.youtube.com/watch?v=mxeJRU-CFe8
- Last Judge boss strategy: https://www.youtube.com/watch?v=VSaIV0MfjJU
- Map acquisition walkthrough: https://www.youtube.com/watch?v=0Fn_hbLJxdc

Open Interactive Map (All Areas)
Opens the full interactive Silksong map in a new tab.